Building the Rim
Having built several instruments I had a pretty good idea of how I wanted everything set up, what I needed in my shop and how often I would be using it. So It didn't take to long to get set up.
I plan to start a little different with this one, do things in a different order. In the past I started with the neck or the top, two of the easier steps. This time I plan to start with the rim, the part that has given me the most trouble in the past.
 |
| Here is the Shop. The Drill press on top of the book shelf. The mandolins hanging on the tool cabinet. The barrel in the corner is for wood shavings from the carving process. We use the shavings to light the fire in our wood stove that heats the house. |
 |
| The other shot. This is my workbench under the window. In Daylight out that window I can see the treeline that follows Mosquito Creek. On the right is the other power tool that I use most every day in the shop, my bandsaw. |
|
|
|
|
I have a laptop on the shelf just to the left of the bench that has a stroboscopic tuning software on it for tuning and or recording the notes of my plates (Back and Belly of the mandolin). My awesome bench vice that I picked up at a garage sale adorns the bench. The Gentleman at the sale has heard what I build, he has a sale every year and has given me several generous deals to add tools to my shop. Lots of clamps, screwdrivers and chisels, as well as a craftsman bench plane that you'll see in many pictures, I use it to square pretty much everything. Mandolin #2 is hanging on the left an F style with mule deer antler pick guard, truss rod cover and points. On the right is #3 and my only A style I've made so far sporting a Cedar top. Everything is ready to begin. Actually I've already started. The back for this mandolin is joined and sitting in the rack below the
laptop.
 |
| Here Is my poor mans bending iron. I could spend $130 on the pro setup or I went to the local hardware store and bought a hot knife, a piece of conduit and a couple of bolts with nuts and washers. Grand total of...$25 |
 |
| The best shallow water container I could find in the house. I've used the same thing on all my mandolin builds so far. An ultimate frisbee flipped upside down and filled about 1/4" with water. I dip the tips of my fingers in the water, then I heat the wood on the iron. When the wood reaches a certain temp It turns amazing. They call it "plastic" and yes that's about what it seams like, it bends very easily. I keep it moist because the water turns to steam and the steam carries the heat through the wood. So its dip, moisten, heat, bend, smile with delight as the step of the process that once was so hard to figure out goes smoothly. | | | | | | | | | | | | | | | | | | | | | |
|
|
 |
| I have built an inside jig for holding my sides. this works great with the spring clamps I like for this purpose. I bend the piece to fit and clamp it in. Then I leave it to "set" overnight. I'm not sure what that does other than dry out the moisture in the wood. But I've done it and in theory it helps. This form holds two of the pieces that make up the bent sides. The other goes in a different form. I tried to build the two forms together and decided it would just work better to do them separate. |
 |
Here is the rim still in the form with the "W" piece sitting on the side waiting for the lower point block to be glued in. The neck heel block is actually already glued in this picture. I built the form with a removable block in the neck and scroll location so I can pull it out, insert my heel block and glue it right in this form.
 |
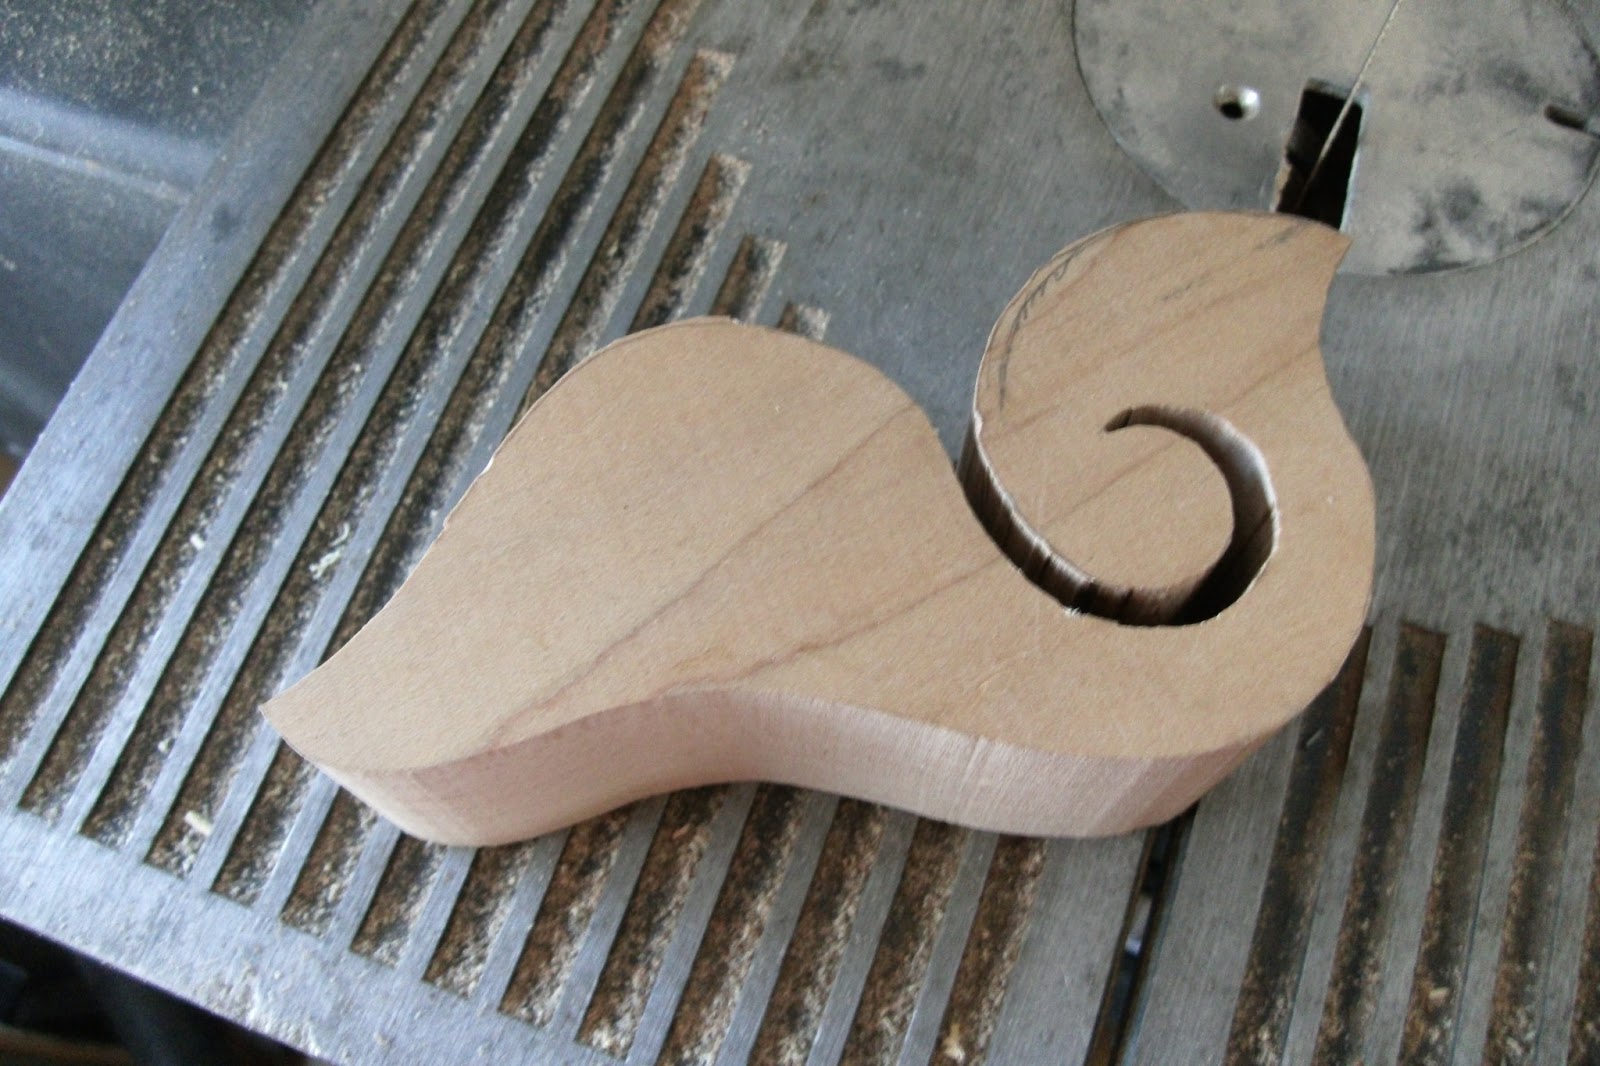
| The heel block has been another though step. My new idea for this one was taken from fine joinery and children's activity books. I used to love to do the "connect the dots". I would sometimes just go completely literal and connect all the dots and end up with an elephant that looked like he was stuck in a spider web. Anyway I decided to try to connect the dots on the heel block too. I traced my pattern on the block of maple and used the drill press to drill a bunch of holes around the sides and the scroll. I then took it to the band-saw and connected the dots. Its the cleanest and most square heel and scroll I've done so far. I patted myself on the back, got out my files and spent the next two hours cleaning it all up and removing saw blade marks. Still not a seamless process but I'll probably use it again. |
 |
| Now with all the pieces I need to do so I'll glue the rim together. This takes some trimming and fitting but pretty soon I have the pieces fitting and the glue pot hot. I use hot hide glue on every joint, It gives me the option to go back and reverse my gluing to make repairs and adjustments. I didn't use Hide glue on my first mandolin and still tell my dad, "If you can ever get the neck to fall off of that instrument I could put it back on at the correct angle." So far he hasn't tried too hard :) | |
|

No comments:
Post a Comment